


Did you know that following a blog content calendar will save you time AND grow your blog faster?
It's true:
Most people put off following a strict content schedule because it feels like they're selling their souls to the devil.
But in fact, you gain back personal time and publish more content with less effort.
How?
Through developing powerful habits, your content creation becomes automated.
And a content calendar will help you get there.
In this post, I'll explain exactly what a blog content calendar is, why you need one, and how to create your own, step-by-step.
Let's dive in.
What Is a Blog Content Calendar?
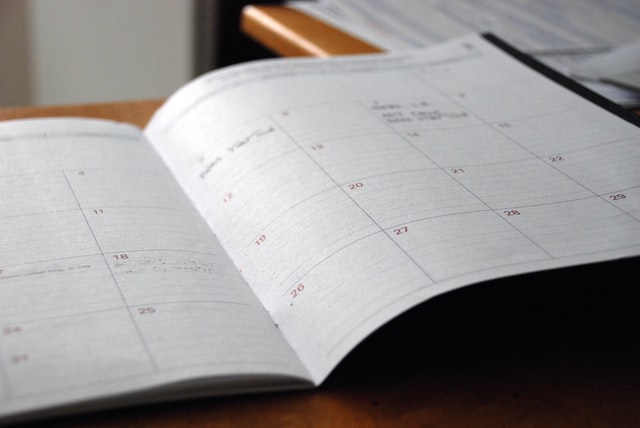
In simple terms, a blog content calendar is knowing what you want to write for your blog and when to write it.
It doesn't matter what tools you use to create a content calendar. What is important is the system behind it and creating habits that develop a consistent publishing schedule.
Many bloggers list their blog post ideas and start writing as and when they feel like it.
This approach never creates consistency because it's too irregular.
Creating a blog content calendar defines everything involved in reaching your blogging goals, from keywords and headlines to outlines and publishing dates.
To make your publishing schedule work effectively, you'll need to use some form of technology tool to organize everything.
More on that later.
Why You Need a Content Calendar for Your Blog
Many bloggers struggle to define what to write about, but the ones who succeed plan everything in advance.
A content calendar helps you plan what you want to publish and stick to a consistent schedule.
Here are 3 benefits of creating a content calendar for your blog.
Benefit 1: Prevents overwhelm
Knowing what to write about and creating a clear plan removes doubts and uncertainty.
It also eliminates the need to think about what you need to write next.
Why?
Because thinking, doubting, and uncertainty creates a feeling of being overwhelmed and analysis paralysis.
Following a predetermined set of articles to write inside a project management tool develops clarity and progress.
Benefit 2: Develops powerful habits
When you create a blog content calendar and consistently stick to your schedule, you develop habits that become second nature.
It's true:
These habits won't happen overnight. They need consistent repetition to absorb into your unconscious mind.
And content calendars help develop these habits better than anything else.
Benefit 3: Achieve your blogging goals faster
Your blog's growth comes down to the amount of content you produce and the effectiveness of your content marketing.
If your publishing schedule is inconsistent, there's no way to predict when you'll hit your blogging goals.
Knowing the amount of content you'll publish in advance helps you define, plan, and track your goals for a better chance of success.
What Should a Blog Content Calendar Include?
To create an effective blog content calendar, you'll need to define specific details of each article you want to write.
Here are some essentials you might want to include in your content calendar:
- Blog post keywords
- Purpose/intention of the post
- Potential headline
- Blog post outline
- Category
- Blog post type
- Featured image
- Publish date
Let's dig a little deeper into each of these, so you know what they all mean.
Blog post keywords
This is the keyword you would have found when performing keyword research.
You'll want to assign at least one primary keyword to each of your articles and the search volume.
Purpose & Keyword intent of the post
The keyword intent and purpose of your article ideas are super important.
Why?
Because the keyword intent should match what's already ranking, Google may not think your articles should be included on the first page of results.
You can also define the article's purpose, which could be anything from generating leads to promoting an affiliate product.
Including these will help you make each article hyper-targeted for the reader.
Potential headline
Blog post titles need to grab the attention of your target audience, so it's essential to define this before you write your first draft.
Adding this to your content calendar will keep you organized and save you time in the long run.
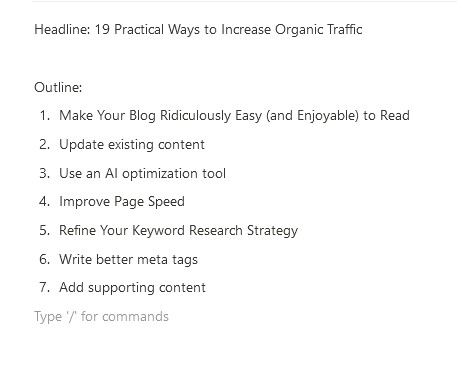
Blog post outline
The blog post outline holds the article together and lets you know what you'll be writing about.
Whether you are writing your own content or hiring a team of writers, including the outline in your content calendar is wise.
Category
Adding the blog post category to the calendar will keep you informed of how many articles you have per topic on your blog.
Blog post type
The blog post type can be a how-to post, a listicle, or ultimate guide.
Including the types of blog content in your calendar keeps you prepared and organized.
Featured image
This could be a link to the image on a royalty-free photo site, like Pexels. Planning this upfront will save you some time when you're ready to publish.
Publish date
This might be the most important aspect of your content calendar.
Defining the publish date will keep you on track to meet your publishing schedule.
Creating Your Own Content Calendar
You can use many different tools to create a blog content calendar.
Here, I have outlined the steps involved for three different options.
The best part?
They are entirely free to use.
Let's dive in.
How to Use Trello as a Blog Content Calendar
Trello is a project management tool that uses a Kanban-style workflow. Each project you create lives inside a board with lists and cards.
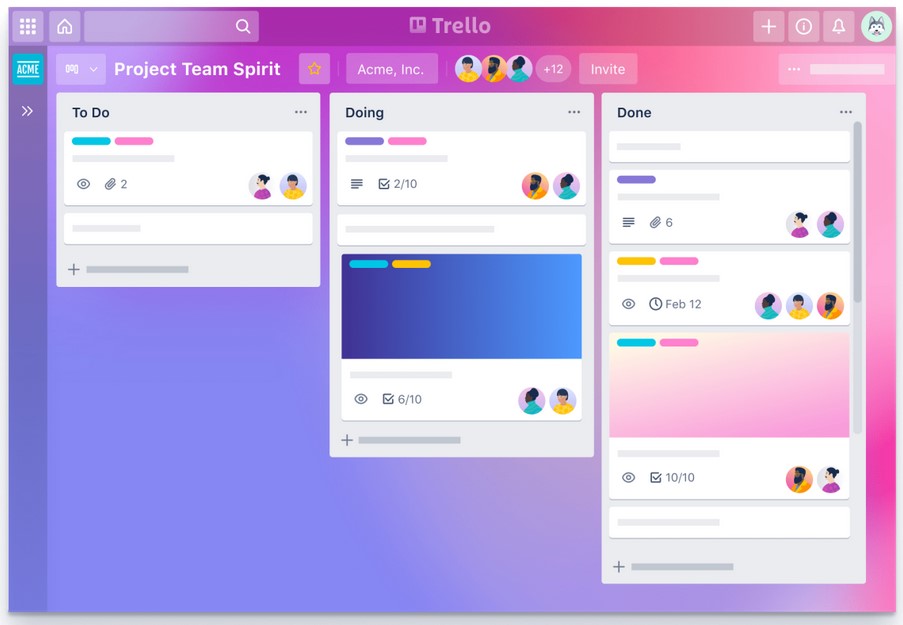
Lists are used to organize different project stages and cards for storing information about various tasks.
Using Trello as a blog content calendar is super easy.
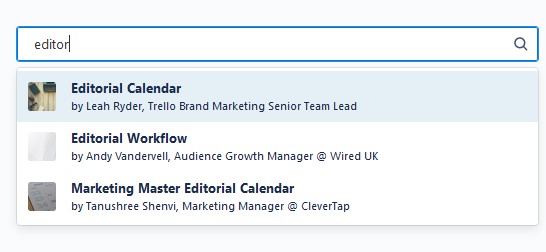
All you have to do is log in, click on the templates library, and search for Editorial Calendar.
Click on Use Template, give your board a title and keep the settings as default.
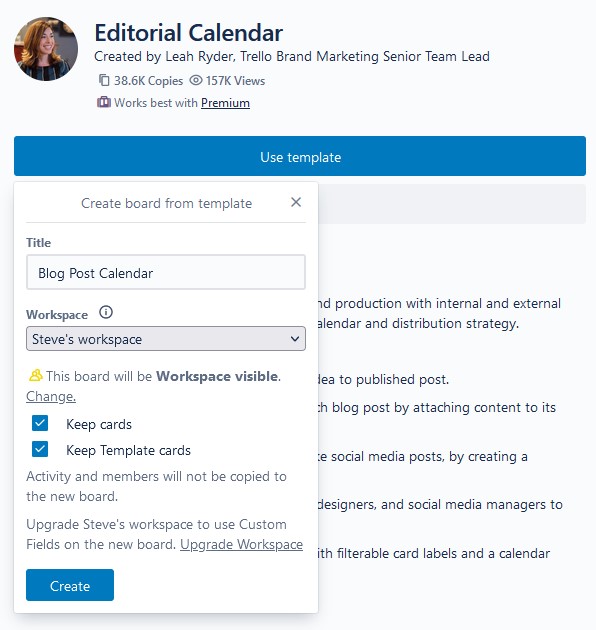
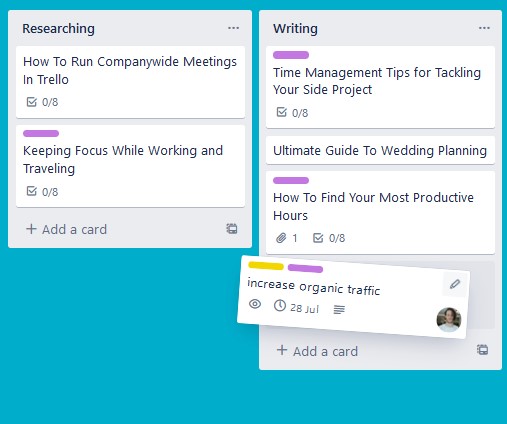
The board will be created, and you'll see the pre-made lists and cards:
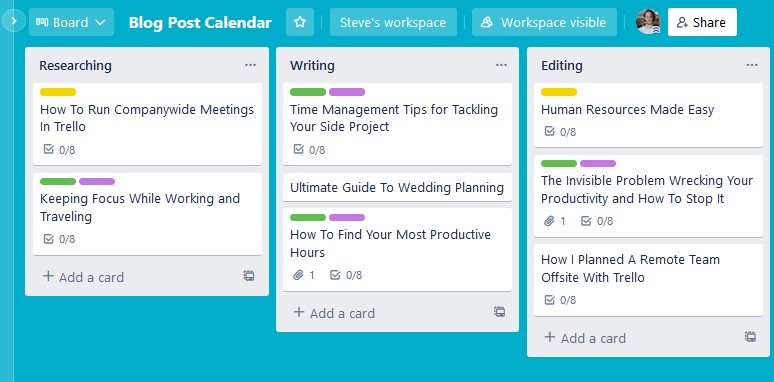
This template has 6 lists that are perfect for each stage of the blogging process:
- Researching
- Writing
- Editing
- Making Graphics
- Ready for Publishing
- Published
The template also comes with pre-filled cards, which can give you ideas for your own tasks.
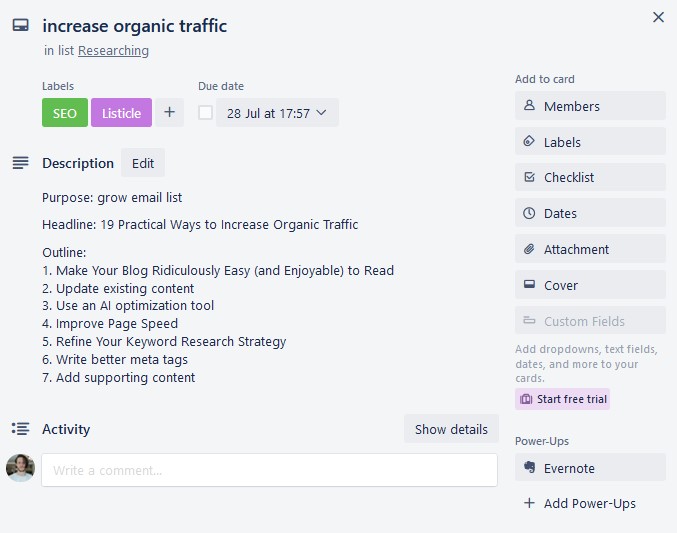
Adding Blog Post Details to a Trello Content Calendar
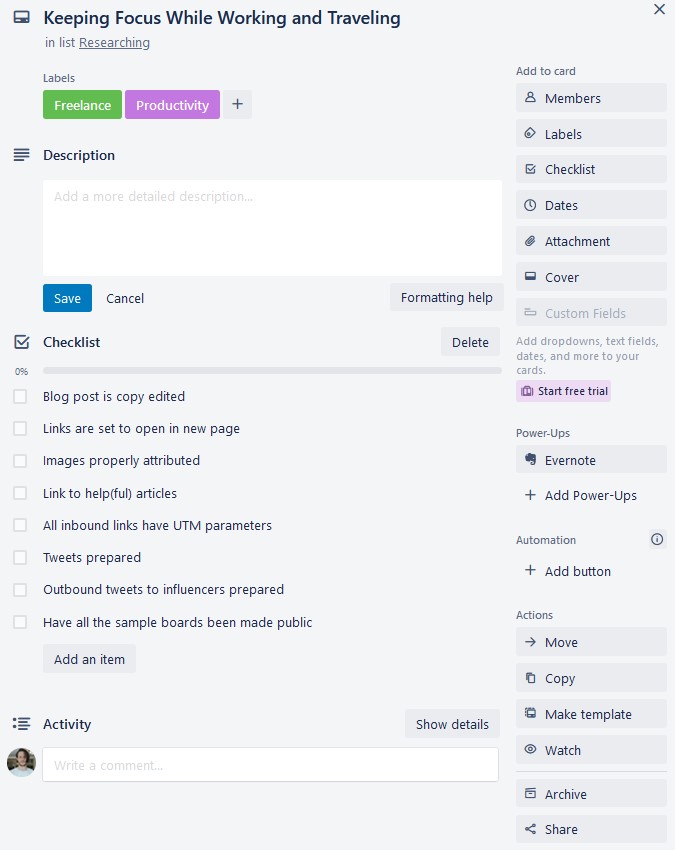
We can see that each card (or task) has a title, labels, a description, a checklist of subtasks, and an activity section for comments.
Let's map out the elements of a blog post to where they'll live within a Trello card.
- Blog post keyword can be used as the card title
- The article purpose, potential headline, and post outline can be added to the card description
- The blog post category and blog post type can be used as the card label
- A featured image could be added with the attachments button
- And the article's publishing date can be selected under dates
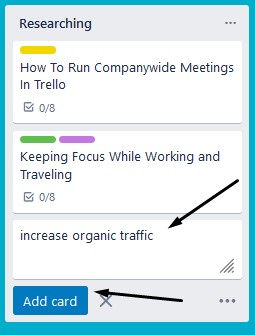
To add cards to your board, type the article's keyword under the research list and click add card or press enter:
Then click on the card to add the details of the blog post:
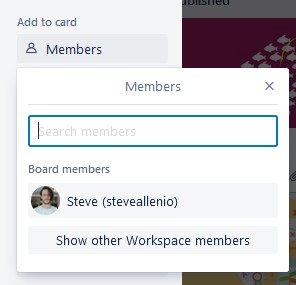
You can also assign people to a task by clicking on members:
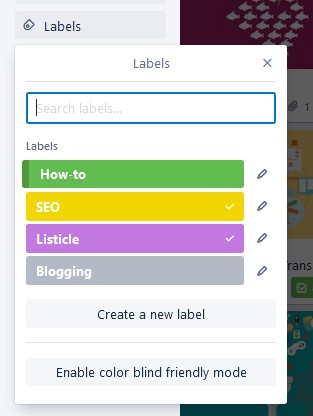
You can customize the labels by clicking on the button:
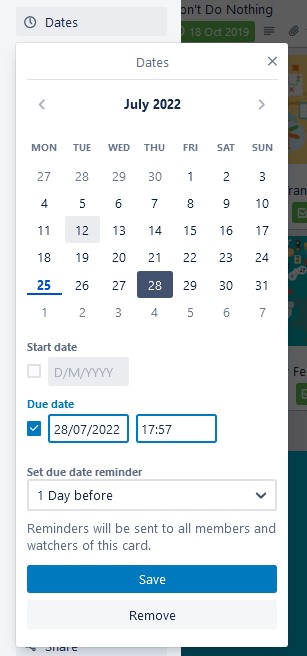
Add a publish date under dates:
Once you've added your blog post idea to the board, it's time to write new content.
Then, as you move through different stages of your content creation process, move the cards along the board under the respective list:
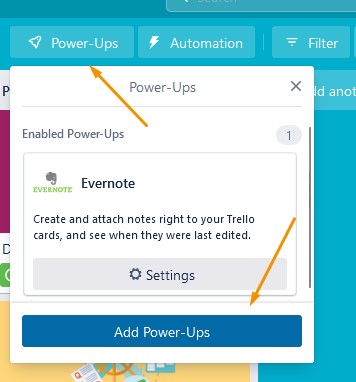
What about viewing your board in the calendar view?
Simple. Click Power-Ups and then Add Power-ups:
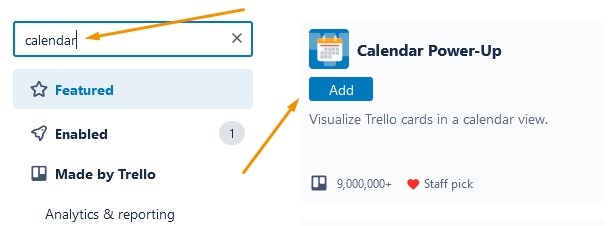
Search for calendar, click add under the Calendar power-up, and then settings:
Now when you go back to the board, you'll see a button that says Calendar Power-Up. Click it to see a calendar view:
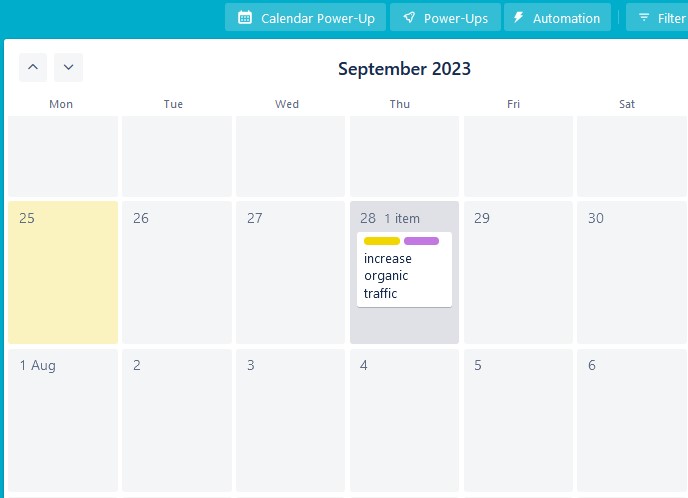
The cards that have a date assigned to them will show up on the calendar.
Following this system in Trello will keep you super organized and help you consistently publish more quality content.
How to Use Notion as a Blog Content Calendar
Notion is a newer productivity tool gaining a lot of attention since its launch in 2016.
It's like the Swiss Army Knife of productivity and knowledge management because it covers everything.
Like Trello, you can import a ready-made template for your blog content calendar.
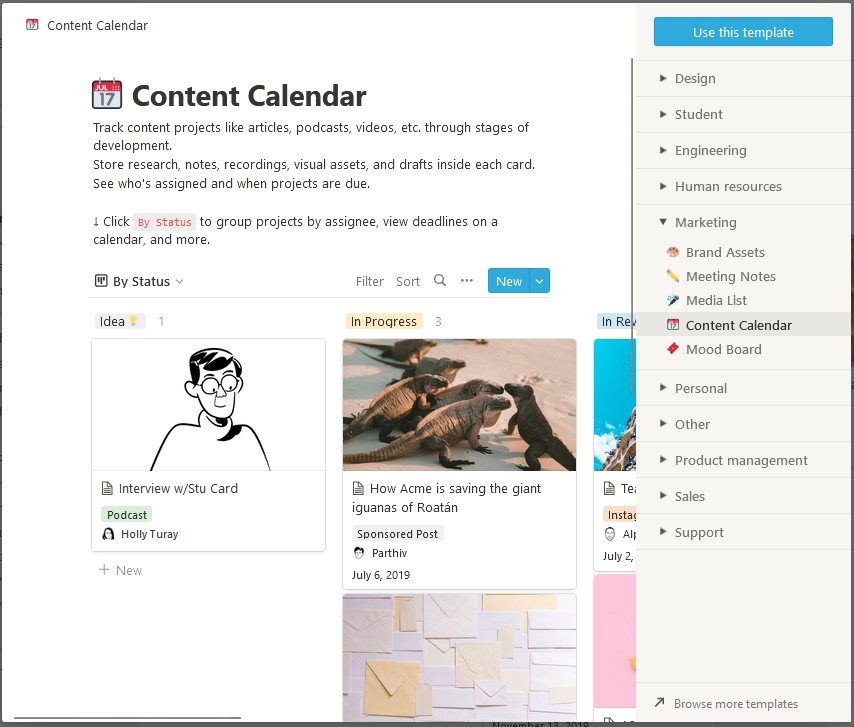
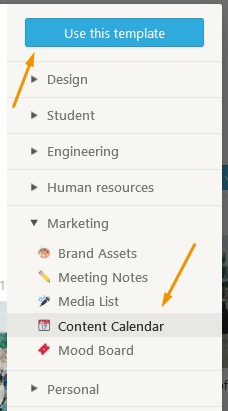
Login to your account and click on Templates:

Under the Marketing tab, click Content Calendar, then Use This Template:
This will be added to your page in the classic Kanban style:
The biggest difference between Notion and Trello is the number of views available.
Trello lets you see a calendar view using the Power-Ups, but you'll need a premium account if you want access to other views such as timelines, tables, and charts.
The views available in Notion are:
- By Assignee
- By Status
- Deadline Calendar
- Launch Calendar
- Published
- Timeline
- And more
And best of all?
They are all included in the free version of Notion.
By Status is the view I'll be focusing on in this tutorial and is the view also available for free in Trello.
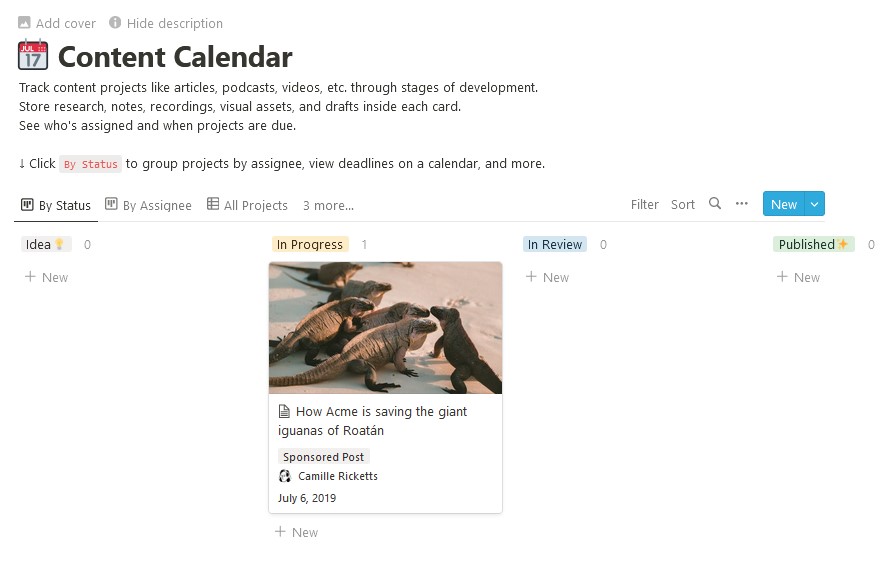
The default stages in this Notion template are:
- Idea
- In Progress
- In Review
- Published
Adding Blog Post Details to a Notion Content Calendar
Like Trello, you will add your blog post ideas to the Idea column. Then you can click on each card to add further details.
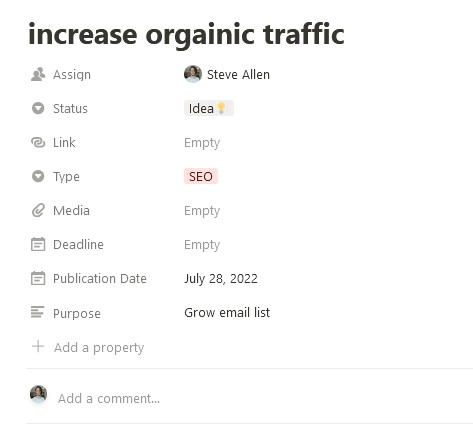
- Title the card with the article keyword
- Assign people to a post under the Assign option
- Add the blog post type or category under Type
- Add a featured image under media
- And the Deadline and Publication date is when you want to complete the article
You can create a new property if you want to include the intent and purpose of the article.
And the blog post outline can be added to the main body of the page:
Now you can add all the ideas you have for your blog content strategy and move them along the different stages as you complete them.
Let's look at the calendar view:
This gives us a visual of when things need to be done, keeping everything clean and organized.
How to Use Google Sheets as a Blog Content Calendar
Don't want to use tools with all the bells and whistles?
No worries. Use a Google Sheet instead.
And the news is that creating a blog content calendar using Google Sheets couldn't be easier.
You won't be able to move things around as seamlessly as the other options, but this option offers more simplicity.
The best part?
I'll show you how to sync your Google Sheet content calendar with Google Calendar. That way, you'll be able to see all the articles you need to publish inside your Calendar app.
Let's dive in.
Go to Google Sheets and create a new Sheet. You'll need a Google account and be signed in.
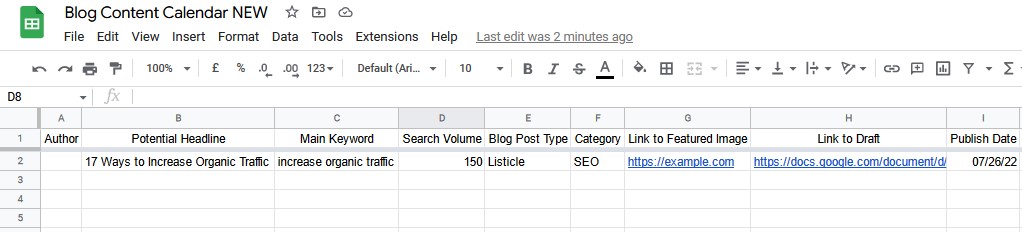
First, you'll want to add the column titles for each element of the blog post.
Like this:

I've added:
- Author
- Potential Headline
- Main Keyword
- Search Volume
- Blog Post Type
- Category
- Link to Featured Image
- Link to Draft
- Publish Date
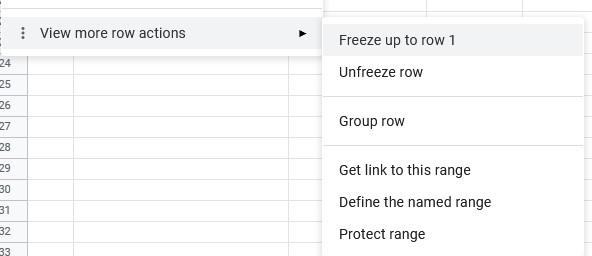
Then, select the first row and freeze it by left clicking it and selecting Freeze up to Row 1, under View more row actions:
Then, when you find new article ideas, simply add them to the main keyword column.
You can also add a search volume, the blog post type, category, a link to a Google Doc with the outline, and most importantly, the publishing date:
That's it!
How about connecting it up to a Google Calendar?
Here's how:
Go to the website ifttt.com and create a free account. IFTTT lets you connect two tools together so that they can interact with each other.
We will get IFTTT to create a Google Calendar event when you add a new row to your content calendar in Google Sheets.
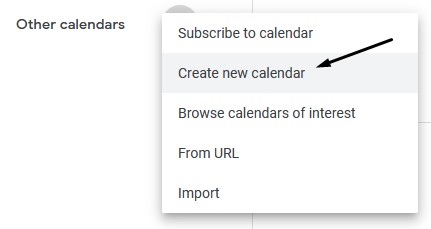
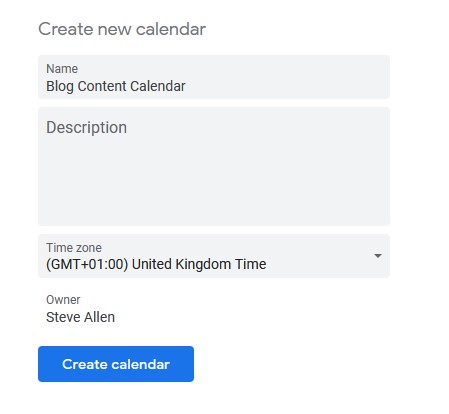
First, go to calendar.google.com and create a new calendar called “Blog Content Calendar”:
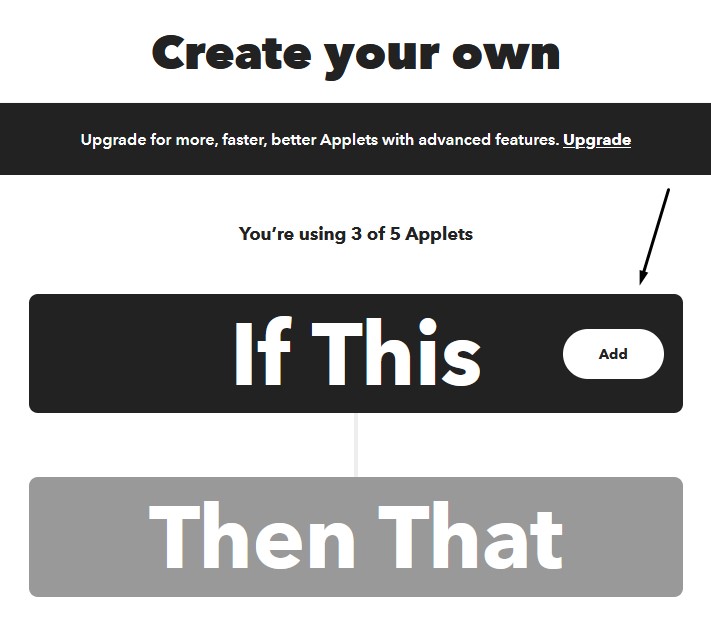
In the IFTTT dashboard, click on create and then the If This button:
You'll need to connect to your Google account so that IFTTT can access the data in your Sheet and add events to the calendar.
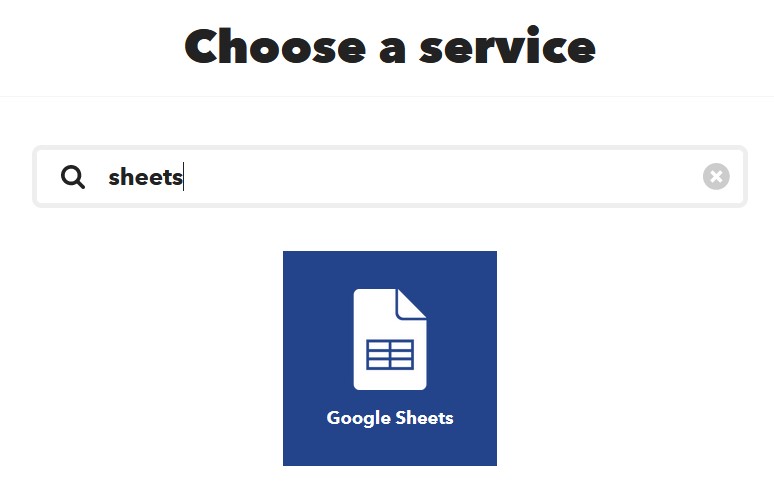
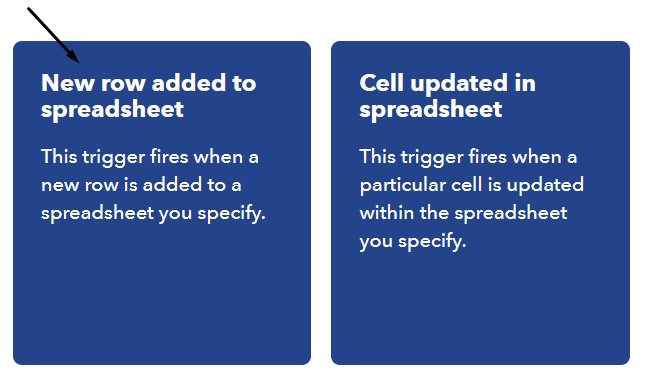
Then search for the Google Sheets applet to activate it:
Then select “New row added to spreadsheet”:
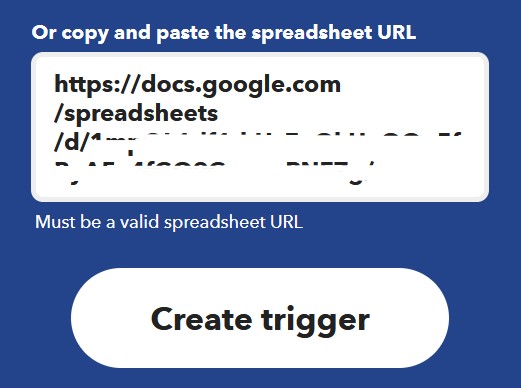
Copy the Google Sheet URL and paste it into the IFTTT box “Or copy and paste the spreadsheet URL”, then click create trigger:
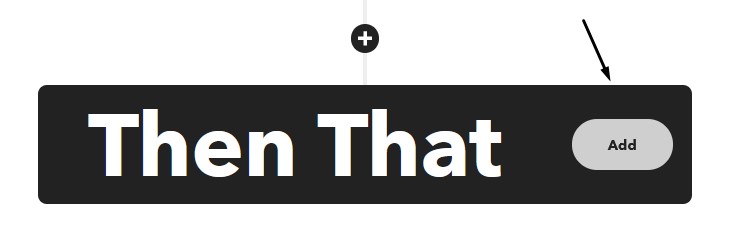
Next, click on the Then That button to connect to Google Calendar:
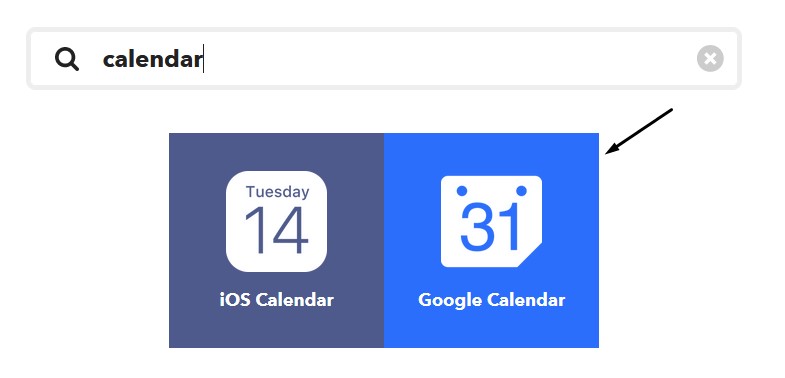
Search and click the Google Calendar applet:
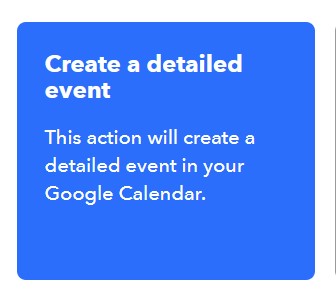
Then click on Create a detailed event:
Now, under Create a detailed event, add these settings:
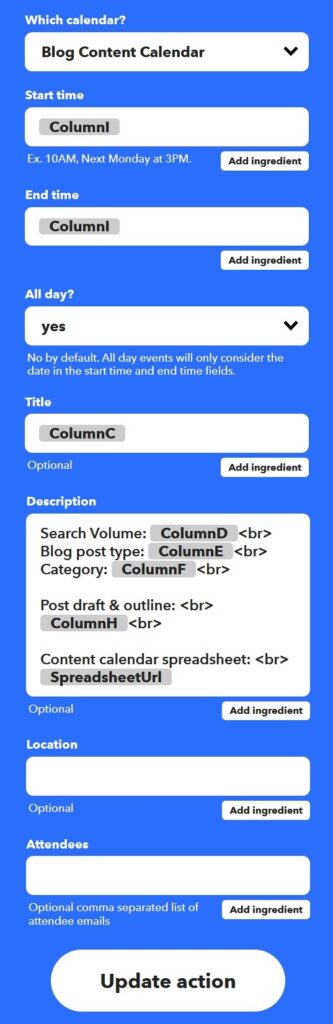
Make sure your own columns match the correct piece of information; otherwise, your Google Calendar will display incorrect details.
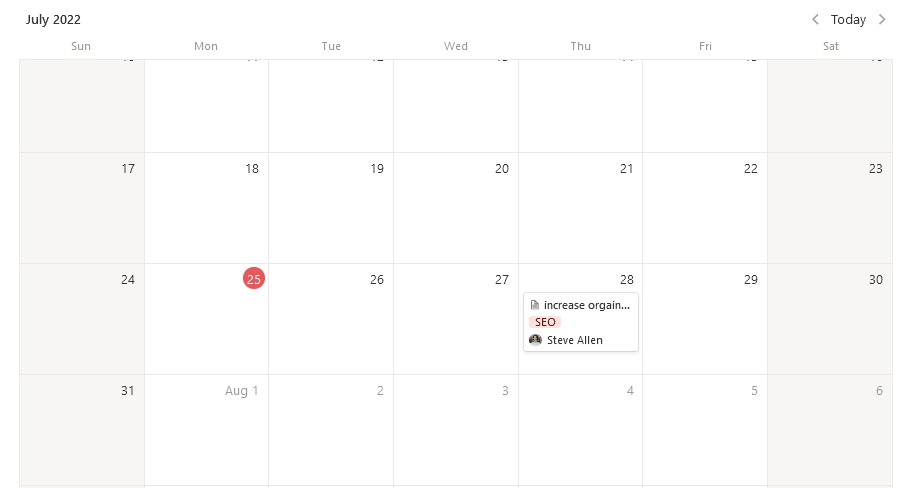
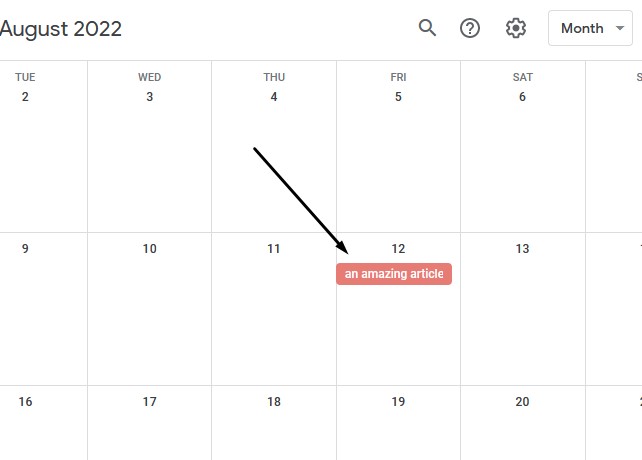
When you add a new entry to your Google Sheet, make sure you add a publish date. After a few minutes, the item will show up in your Google Calendar:
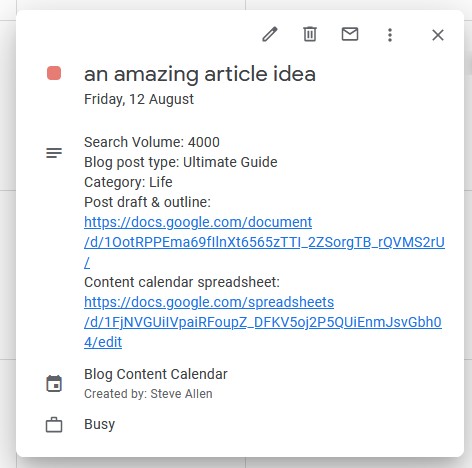
And when you click on the item in Google Calendar, you'll see all the details of your article that needs to be published on that day:
That's it. A simple blog content calendar using Google Sheets that sync up with a Google Calendar.
FAQs
Here are some frequently asked questions people ask about content calendars that you might also be interested in.
Do I really need a content calendar for my blog?
Yes. Unless you are a robot, managing content creation from your head is very difficult.
Here's what the productivity experts say:
“Every minute you spend in planning saves 10 minutes in execution; this gives you a 1,000 percent Return on Energy!”
Brian Tracy
That means spending 1 hour per week planning your content calendar will save 10 hours of writing and publishing content.
What is the difference between a content calendar and an editorial calendar?
A content calendar mainly focuses on a blogs' daily, weekly, and monthly blogging schedule with details of each content piece.
An editorial calendar covers more of a bigger picture of the business's overall content strategy.
What other tools can I use for my content calendar?
There are plenty of tools you can use for a content calendar.
Here are some more for you to look into:
- TaskboardApp (Google Tasks)
- Asana
- CoSchedule
- Airtable
- TickTick
Can I use a content calendar for social media?
Absolutely. You can either include social media posts in your blog content calendar or create a separate one.
Frankly, it might be easier to keep things separate as social media posts won't take as long to create as entire blog posts.
There are other tools that will even post your scheduled social media content for you.
Here are a few to consider:
- SocialBee
- Hootsuite
- Buffer
- MeetEdgar
- Later
Conclusion
There you have it. Publishing blog content can be a walk in the park when you use a content calendar.
If you are new to blogging or have fallen into habits that slow content production down, it can take some time to get used to.
But once you find a system that works for you and you stick to it, you'll develop consistency and grow your blog faster.
If you want to develop a solid content strategy, check out our blog content strategy article.
The post How to Create a Blog Content Calendar That Helps You Stay on Track appeared first on Niche Pursuits.