


Learning how to uninstall WordPress from cPanel is a daunting task for website owners.
It requires a lot of technical knowledge and careful execution. Otherwise, you risk losing your visitors and years of hard work.
That's why we have created a step-by-step guide on safely uninstalling WordPress in multiple scenarios without losing your precious data.
Reasons To Uninstall WordPress
Before we move on to deleting WordPress from your cPanel, let's take a look at some situations where creating a fresh website becomes necessary:
- Your website got hacked with malicious plugins/files
- You want to switch to other platforms, i.e. Shopify, Wix, etc.
- Your website is facing severe errors and requires renewed installation
- You're changing hosting providers or packages
Whatever the case, here are the steps you can use to uninstall a self-hosted WordPress site:
Steps To Uninstall WordPress from cPanel
1. Create a backup of your WordPress database
Before deleting anything, creating a full backup of your website is important. This will be useful if you want to restore your old WordPress files or migrate to a new hosting provider.
Fortunately, WordPress has a built-in backup tool that creates a .XML file with all your posts, pages, and comments.
Here's how you can make one yourself:

1. Log in to your WordPress dashboard
2. From the left menu, click on Tools > Export
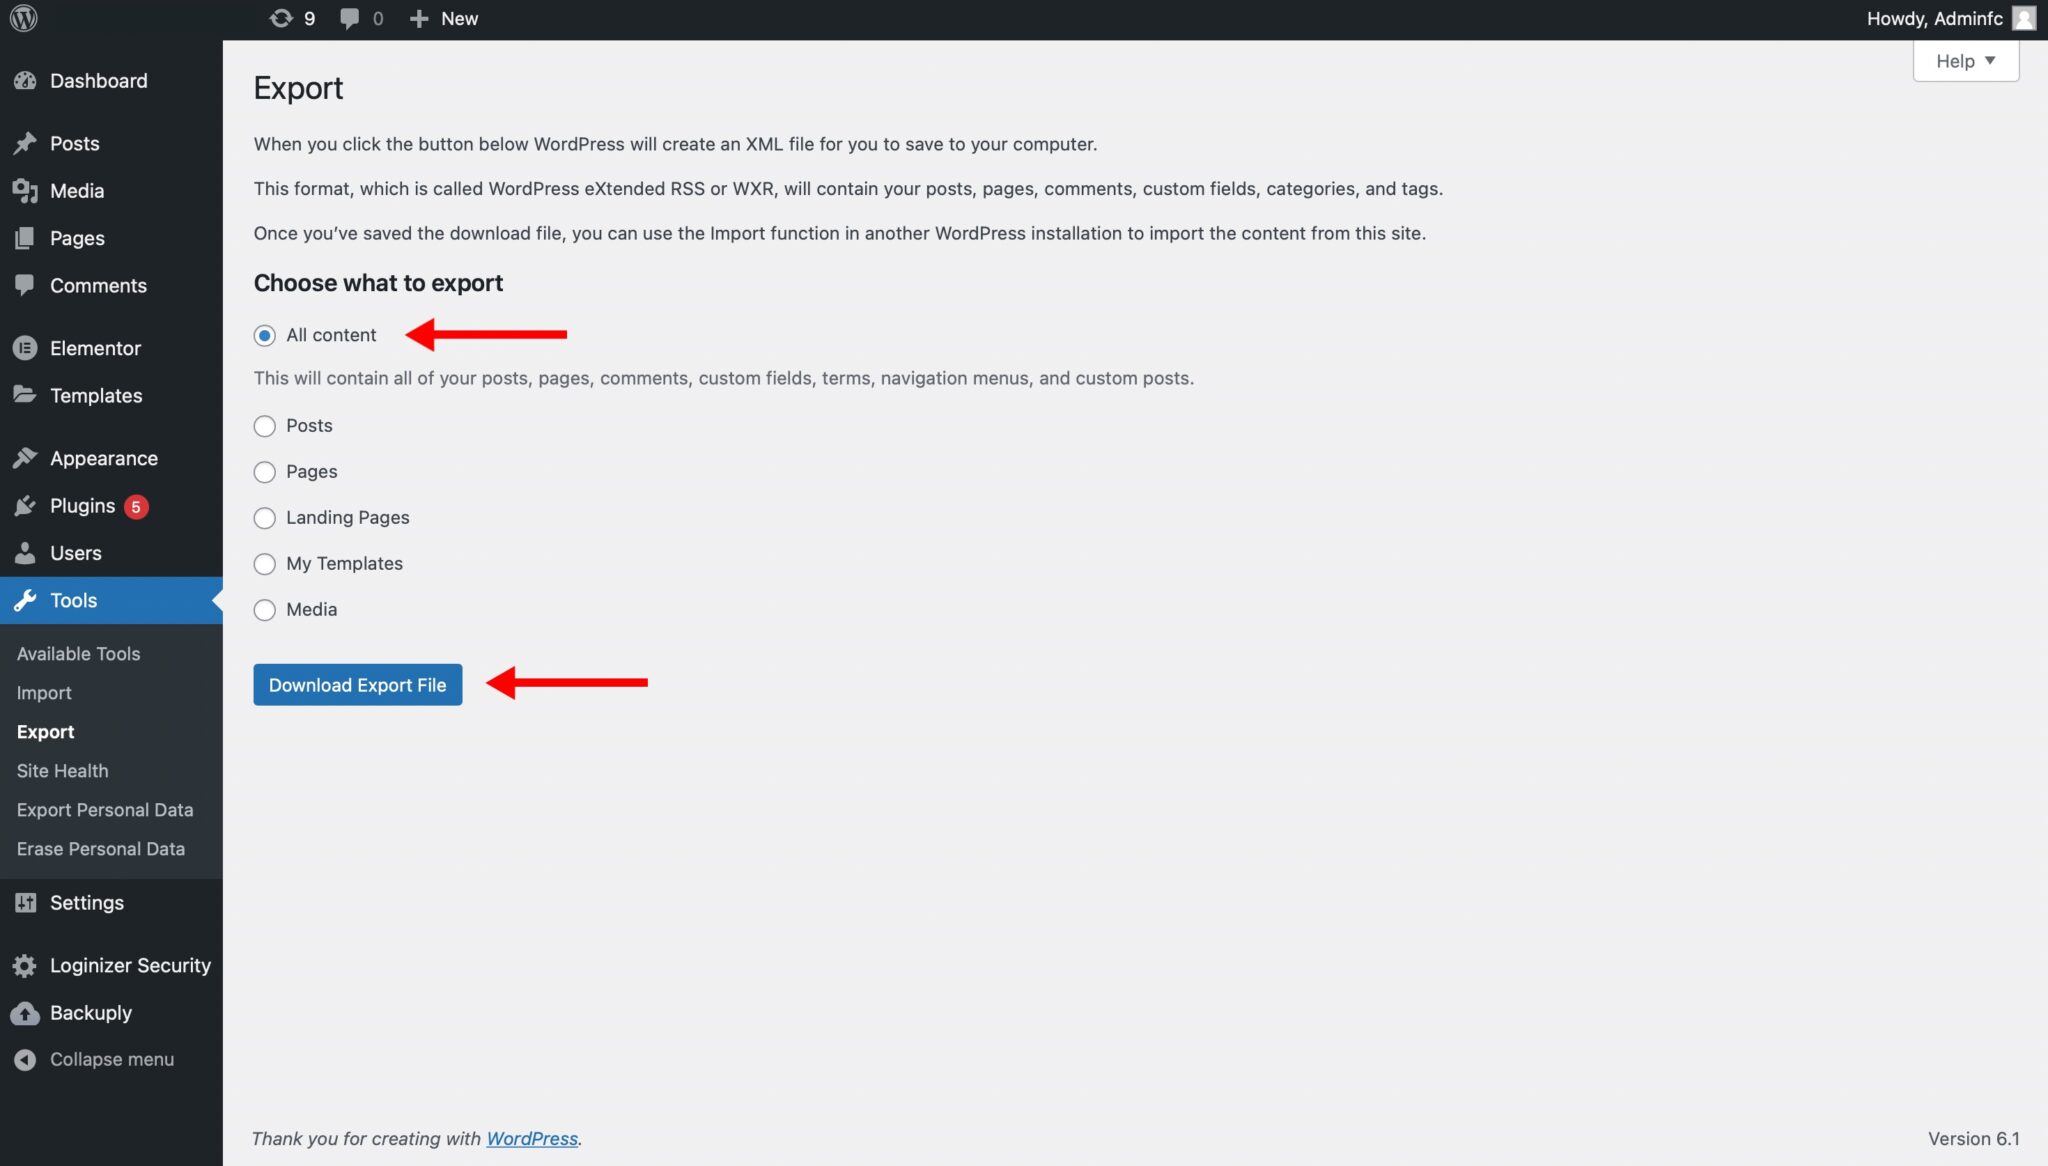
3. Under the ‘Choose what to export' option, select ‘All content'
4. Press the ‘Download Export File' button
Your .XML backup file should begin installing now. We highly recommend storing this file on an external SSD or cloud server like Dropbox or Google Drive.
However, this is just one part of the process. You must also back up your site's theme, plugins, meta tags, media files, and uploads.
All of these play a crucial role in retaining your SEO score. Here is a complete guide on how you can backup your wp-content folder from cPanel.
2. How to uninstall WordPress from cPanel
Once you've made a backup of your database, let's start manually deleting your WordPress website from cPanel.
Important Note: Double-check your .XML and wp-content backup files as there's no going back beyond this point.

1. Login to your cPanel account via your hosting account dashboard or website.com/cpanel
2. Scroll down to the ‘Files' section and click on ‘File Manager'

3. In the new tab, click on ‘public_html' from the sidebar
4. Click on ‘Select All' from the toolbar and then the ‘Delete' button in black
5. Once the confirmation screen pops up, click the ‘Confirm' button, and your WordPress website will be completely erased from the control panel.

6. Go back to the cPanel dashboard, and under the ‘Databases' tab, click on ‘MySQL database'.

7. Scroll down to the ‘Current Databases' section, find the username for your WordPress site, and click on ‘Delete'
8. Click ‘OK' on the confirmation popup
3. How to remove WordPress with Softaculous
A simpler way to automatically uninstall WordPress from cPanel is with Softaculous. This method will also help you delete the domain and user database with a few clicks.
Here's how you can do it yourself:

1. From the cPanel dashboard, scroll down to the ‘Software' tab and click on ‘WordPress Manager by Softaculous'

2. Select the website that you want to delete and click on the dropdown button
3. Press the red ‘Uninstall' button

4. Tick the three checkboxes next to ‘Remove Directory, Remove Database, and Remove Database User'

5. Scroll down and press the blue ‘Remove Installation' button
6. Click ‘OK' on the confirmation prompt
7. Wait for the progression bar to finish to complete uninstalling WordPress.
Ways to reinstall WordPress from cPanel
After successfully erasing your website from the server, it's time to install a fresh copy of WordPress so your website can go live again.
We recommend using the built-in script software called Softaculous to quickly and safely install WordPress without any hiccups.
Here are the steps to do so:
1. How to install WordPress with Softaculous
Softaculous allows for convenient installation of WordPress in just a few clicks. It comes built-in with most hosting services and takes just a few minutes to learn.
Besides WordPress, Softaculous has an array of content management systems in its script library, including Joomla, Open Real Estate, and Concrete CMS.
But we'll focus on WordPress installation for now:

1. Login to your domain's cPanel account
2. Scroll down to the ‘Softaculous Apps Installer' tab and click on ‘WordPress'

3. From the dashboard, click on the down arrow next to the blue ‘Install' button and select ‘Custom Install'
4. Choose the website protocol, domain name, site name, login credentials, and one of the standard themes. If you want to upgrade the appearance of your website, check out our list of the best SEO-friendly WordPress themes.
5. Scroll to the bottom and enter your email address in the ‘Email installation details to:' text box.
6. Press ‘Install' and wait for the WordPress installation to complete.
7. Now, login to your newly installed site from the provided link or ‘website.com/wp-admin'
FAQ's
What are the requirements for WordPress?
Here are some of the basic hardware requirements to install WordPress on your server:
- CPU: Minimum 1.0 GHz
- Storage: Minimum 1 GB
- RAM: Minimum 512 MB
- Database: MySQL 5.015 or more
- PHP: Version 7.4 or more
How to access WordPress cPanel?
Most web hosting services will provide a clickable link redirecting you to the cPanel login page.
If you don't have one, use this URL to access the login page ‘website.com/cpanel'.
Why is my website showing a 404 error after uninstalling WordPress?
The ‘404 Not Found' message signals that you have successfully uninstalled WordPress from your website. If you haven't deleted WordPress yet, check out this guide to solve the error.
Conclusion
Deleting your first WordPress website can be a nerve-wracking experience, especially for beginners with no technical knowledge. However, our guide will help you safely uninstall WordPress from cPanel while securing important web files before you migrate to a different domain, CMS, or hosting service.
If you're considering between WordPress and Webflow, check out our full comparison on the two content management systems.
Or, if you want to create an attractive and intuitive homepage for your visitors, head on to our guide on the best website builders for WordPress.
The post How To Uninstall WordPress From cPanel Step-By-Step in 2 Easy Ways appeared first on Niche Pursuits.